> ## Documentation Index
> Fetch the complete documentation index at: https://dev.chief.bot/llms.txt
> Use this file to discover all available pages before exploring further.
# Use Chief with your AI coding agent
> Connect Chief to Claude Code, Cursor, or Codex and start asking questions in minutes — no SDK or curl required.
Chief gives your AI coding agent direct access to your project. Ask questions about
everything your team has uploaded, add new documents, and automate the busywork —
right from Claude Code, Cursor, or Codex. No SDK, no curl, no boilerplate to get
started.
**Claude Code runs on your computer, not in a browser tab.** You may have chatted with Claude
on the web — Claude Code is different: it runs in your terminal, so it can reach your files and
your Chief project and *build* things for you. Once it's connected you can both **ask** Chief
questions and **hand it these docs and have it build** an integration for you. This guide sets
up both.
## What you'll need
* **An AI coding agent installed** — [Claude Code](https://docs.claude.com/en/docs/claude-code/overview),
[Cursor](https://cursor.com), or [Codex](https://github.com/openai/codex). This guide uses
Claude Code in its examples.
* **A terminal** — the macOS **Terminal** app, or **Windows Terminal** / **PowerShell** on
Windows. This is where you run the commands below.
* **A Chief account** with access to a project.
The terminal is a text window where you type commands instead of clicking. To open one:
* **macOS** — press `Cmd + Space`, type `Terminal`, and press Enter.
* **Windows** — press the Start button and type `Terminal`, `PowerShell`, or `Command
Prompt`. Any of the three works.
Claude Code is the agent that runs *inside* that terminal. Install it by following the
[official install guide](https://docs.claude.com/en/docs/claude-code/overview), then type
`claude` in your terminal to start it. Once it's running, come back and follow the three
steps below.
**If the install is blocked or warns you:**
* **Windows** may show "Windows protected your PC" (SmartScreen). Click **More info → Run
anyway**.
* **macOS** may say the app "can't be opened." Open **System Settings → Privacy & Security**
and choose **Open Anyway**.
* **Locked-down work computers** often block new software outright. If an install is refused
no matter what, run through this on a personal computer instead.
These warnings are normal for new developer tools — they aren't errors. Install only from the
official links above, then allow it to run.
## Connect your agent to Chief
Four steps and your agent is talking to Chief.
If you don't have it yet, install Claude Code with the recommended native installer:
```bash macOS / Linux theme={null}
curl -fsSL https://claude.ai/install.sh | bash
```
```powershell Windows (PowerShell) theme={null}
irm https://claude.ai/install.ps1 | iex
```
Then type `claude` in your terminal to start it. For other install methods and
troubleshooting, see the
[official install guide](https://docs.claude.com/en/docs/claude-code/overview). Prefer
Cursor or Codex? Use either — you'll find their setup in step 4.
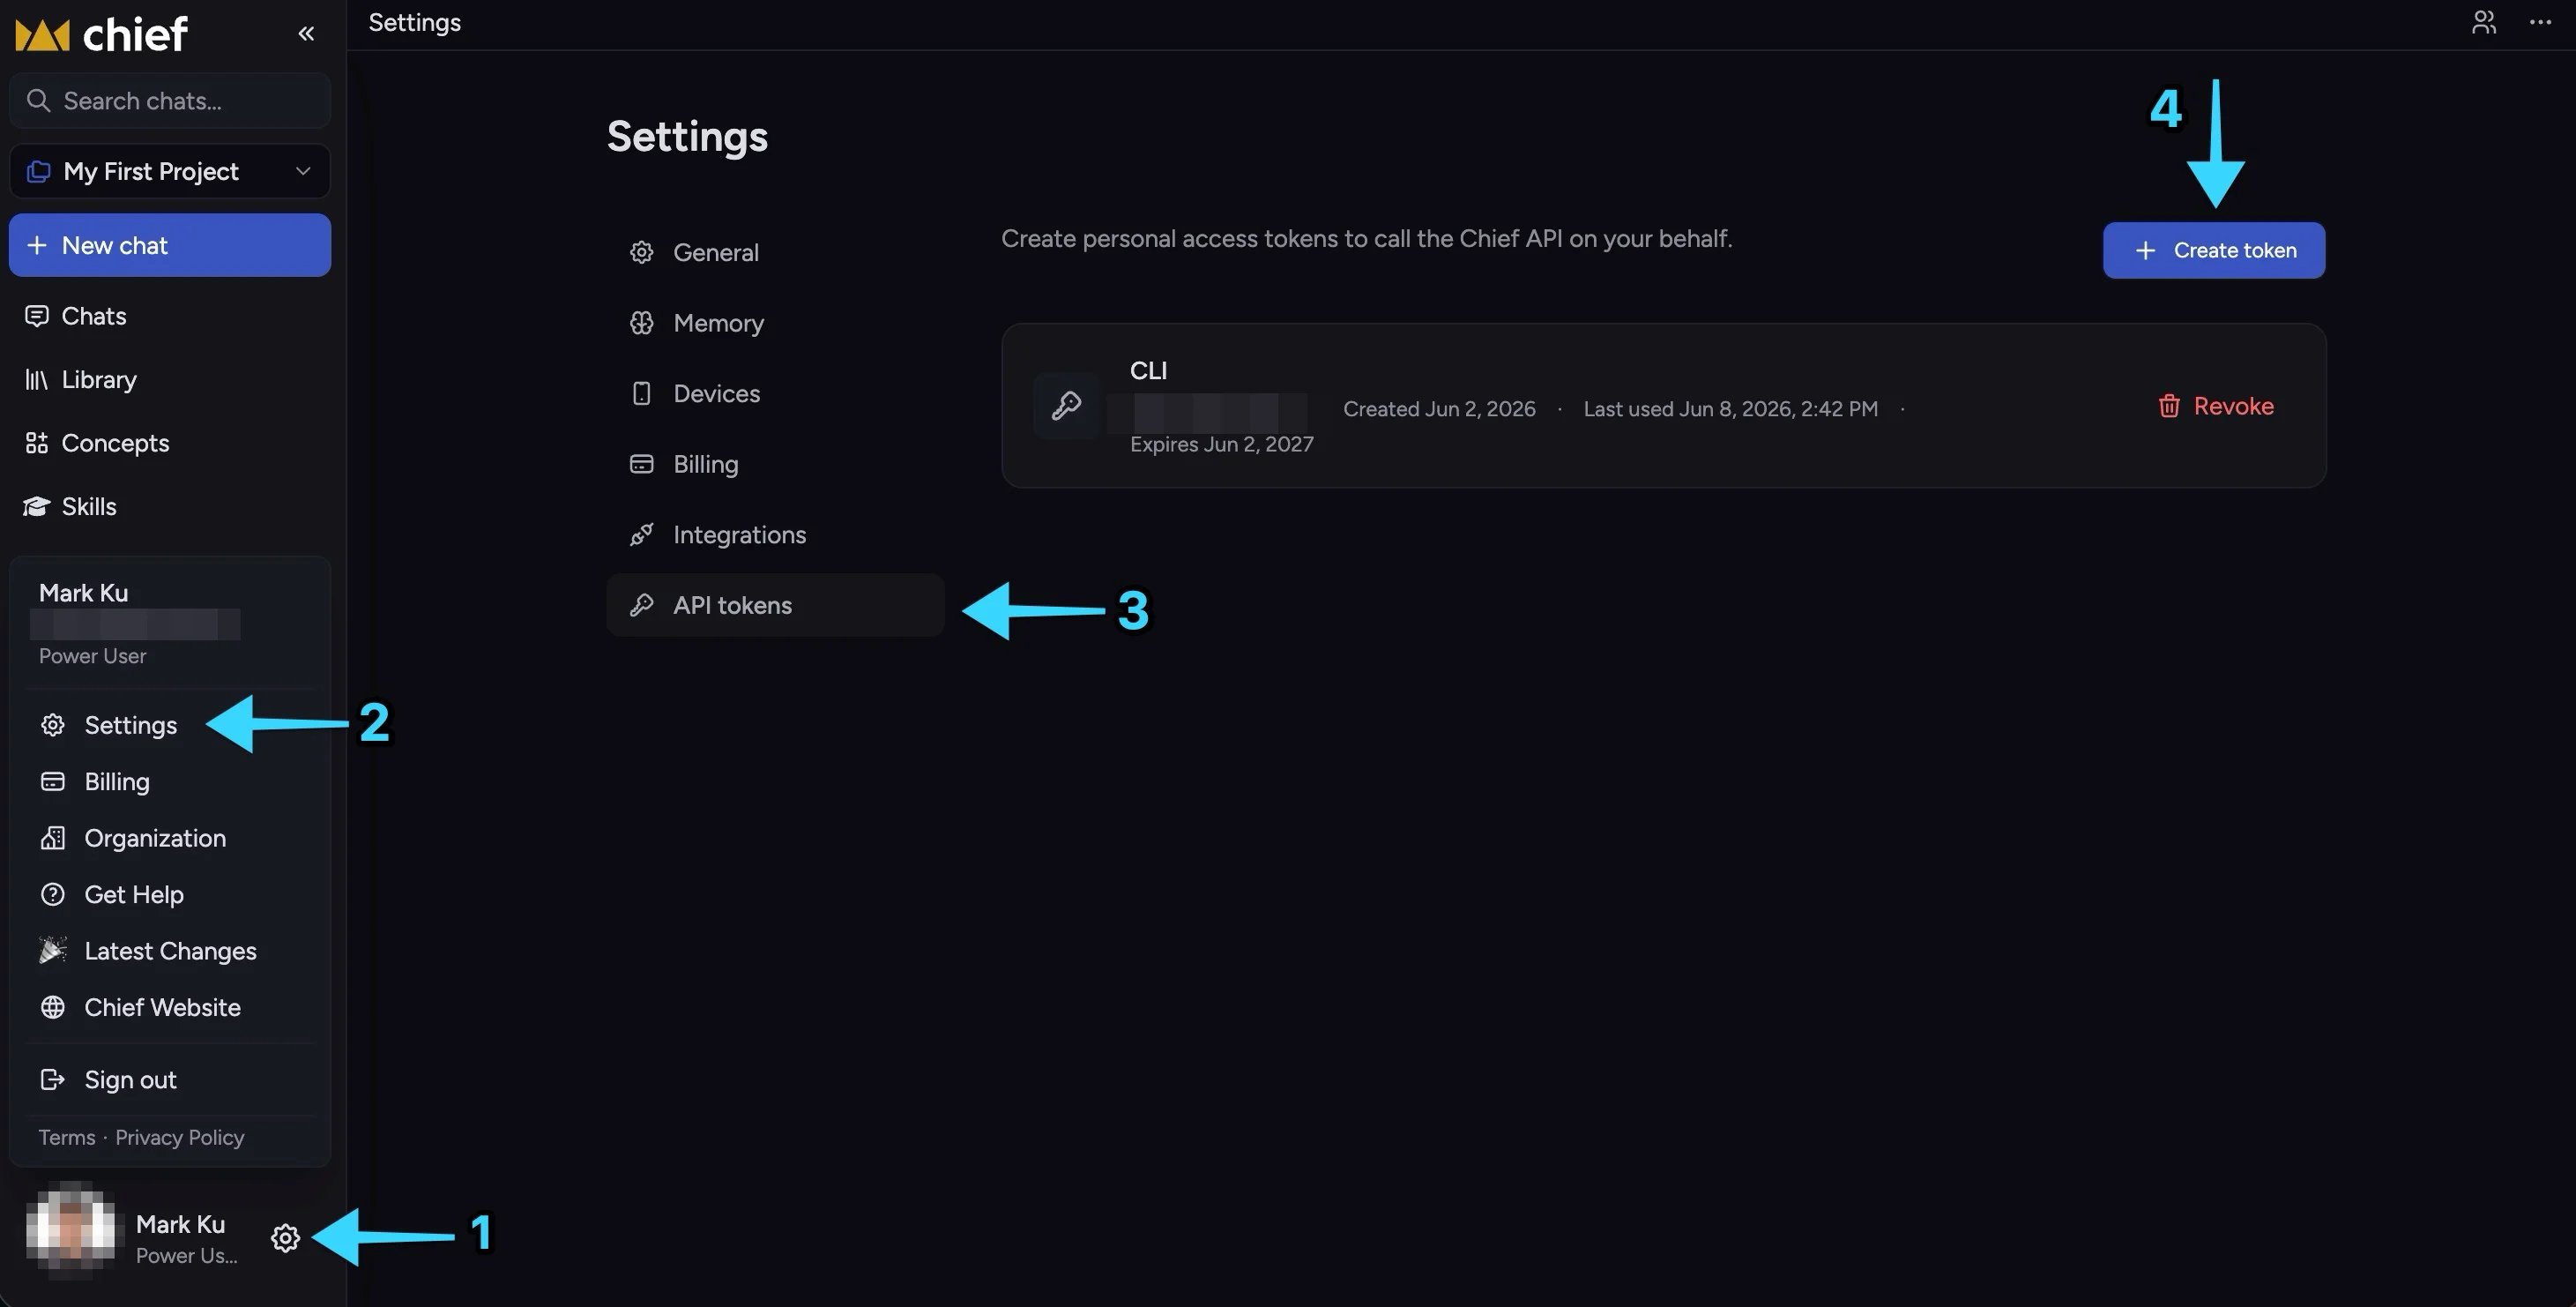
Sign in to Chief. Open your account menu (bottom-left), go to **Settings**, open the
**API tokens** tab, and choose **Create token**.
 Give the token a name, pick an expiration, and select **Generate token**.
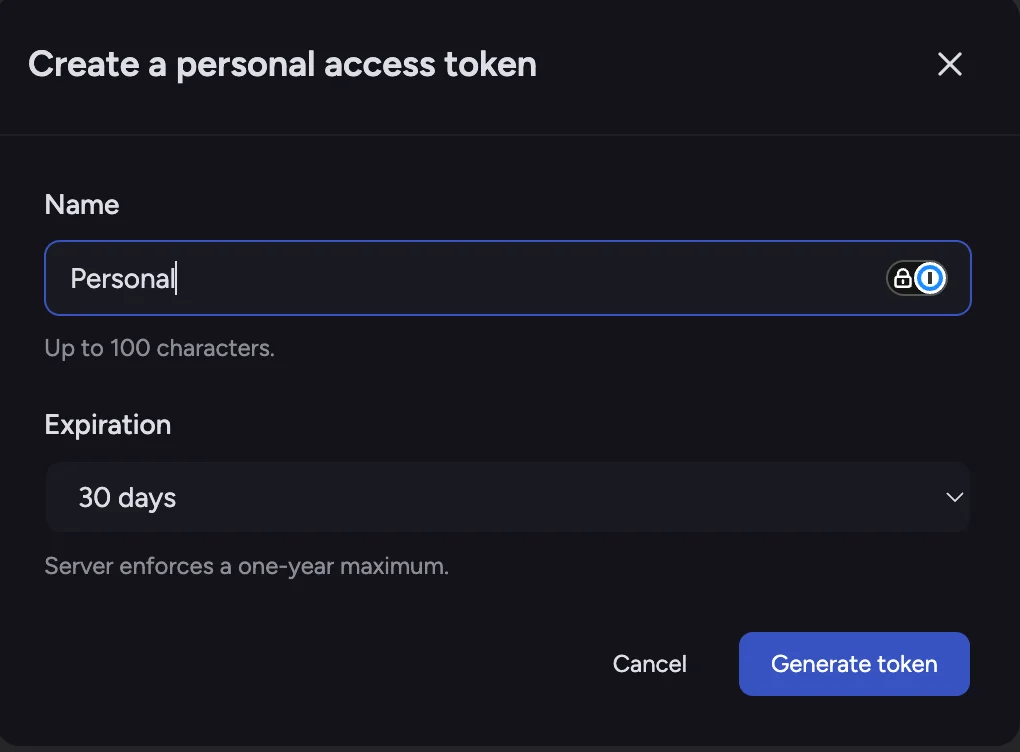 Copy the token as soon as it appears — it starts with `pat_`.
The token is shown **only once**. Copy it now. If you lose it, delete it and create a
new one — there's no penalty.
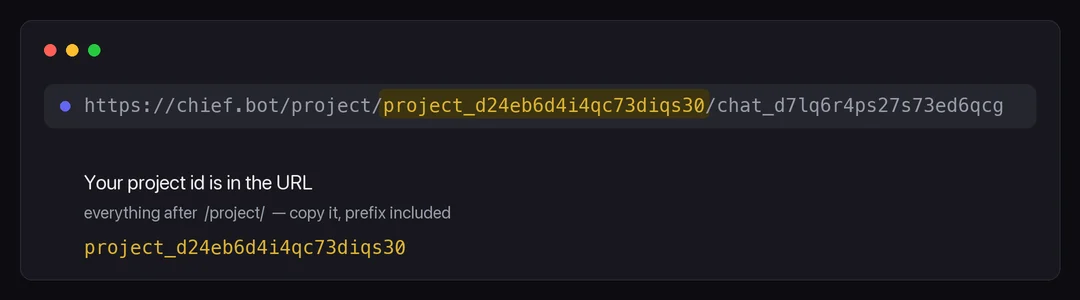
You'll also need your **project id** (it starts with `project_`). Find it in the URL of
any project page — it's the segment right after `/project/`:
Copy the token as soon as it appears — it starts with `pat_`.
The token is shown **only once**. Copy it now. If you lose it, delete it and create a
new one — there's no penalty.
You'll also need your **project id** (it starts with `project_`). Find it in the URL of
any project page — it's the segment right after `/project/`:
 You'll paste both into your agent's config below.
```bash theme={null}
brew install --cask Storytell-ai/tap/chief-mcp
```
Other install options (Go, prebuilt binaries) are on the
[MCP server page](/mcp/overview#install).
```bash theme={null}
claude mcp add chief \
-e CHIEF_API_KEY= \
-e CHIEF_PROJECT_ID= \
-- chief-mcp stdio
```
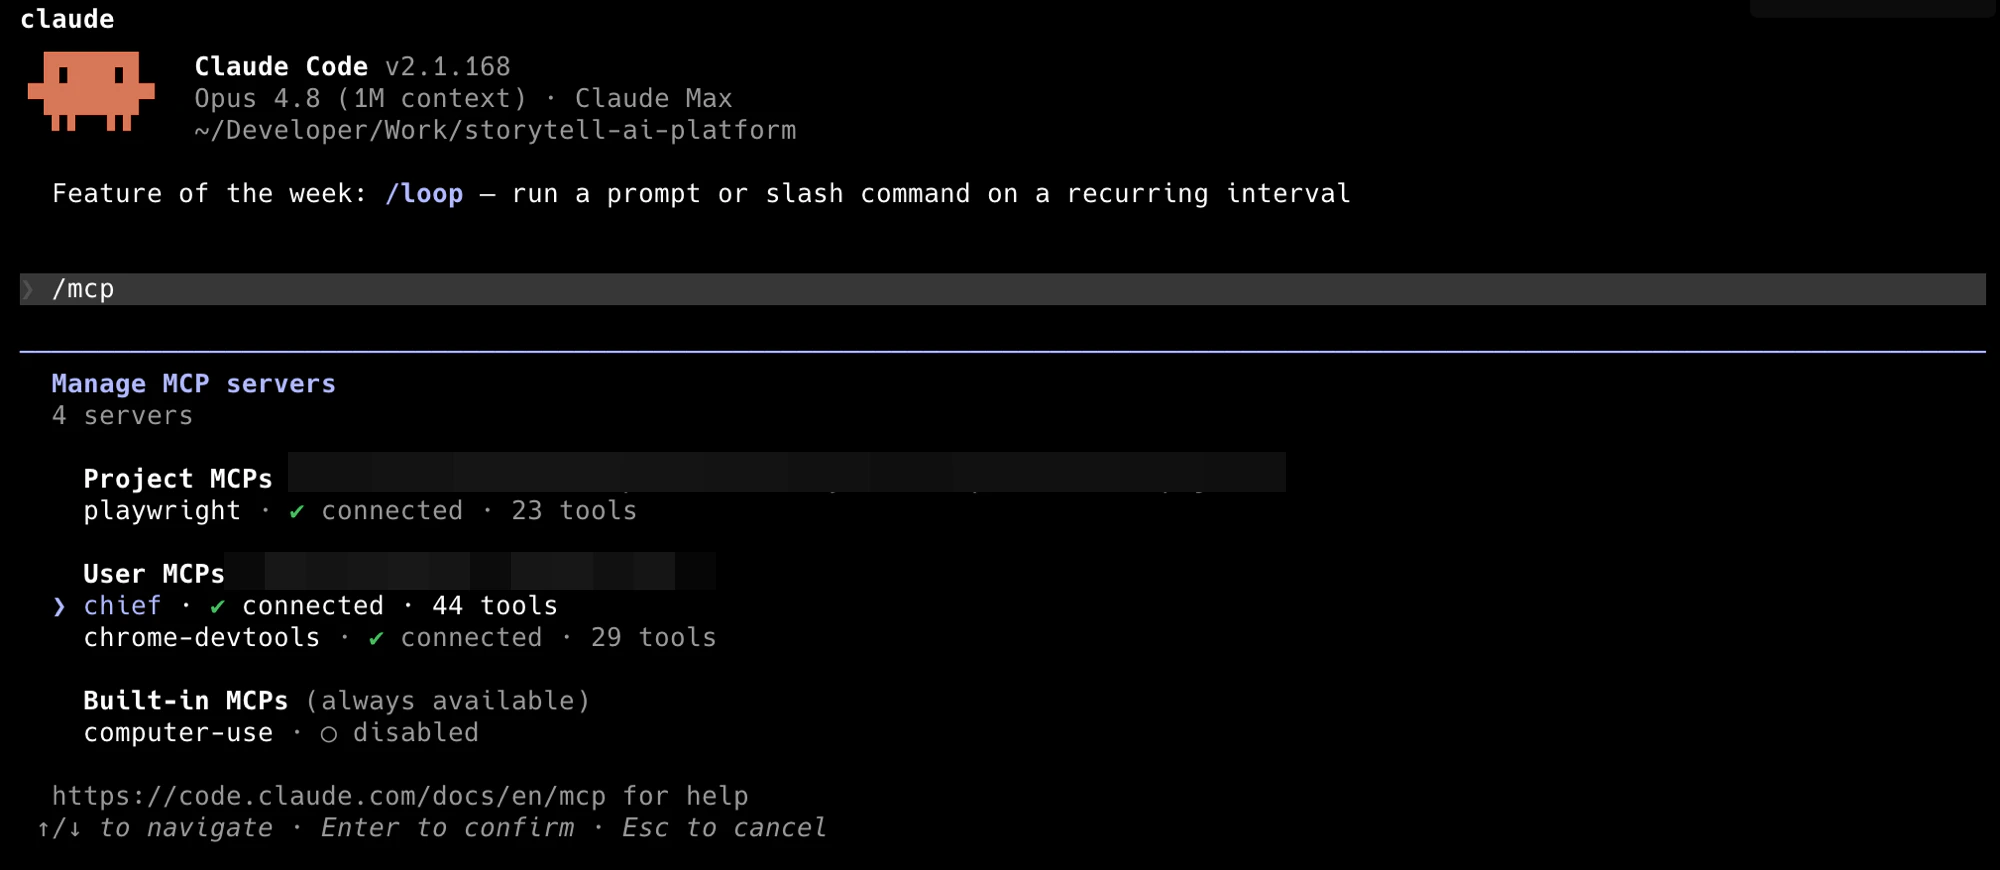
Restart Claude Code so it picks up the new server — that's it.
You'll paste both into your agent's config below.
```bash theme={null}
brew install --cask Storytell-ai/tap/chief-mcp
```
Other install options (Go, prebuilt binaries) are on the
[MCP server page](/mcp/overview#install).
```bash theme={null}
claude mcp add chief \
-e CHIEF_API_KEY= \
-e CHIEF_PROJECT_ID= \
-- chief-mcp stdio
```
Restart Claude Code so it picks up the new server — that's it.
 [](cursor://anysphere.cursor-deeplink/mcp/install?name=chief\&config=eyJjb21tYW5kIjoiY2hpZWYtbWNwIiwiYXJncyI6WyJzdGRpbyJdLCJlbnYiOnsiQ0hJRUZfQVBJX0tFWSI6IiIsIkNISUVGX1BST0pFQ1RfSUQiOiIifX0=)
After install, open the server in **Cursor Settings → MCP** and fill in your
`CHIEF_API_KEY` and `CHIEF_PROJECT_ID`. Prefer to paste config by hand? See
[MCP clients → Cursor](/mcp/clients).
Add to `~/.codex/config.toml`:
```toml theme={null}
[mcp_servers.chief]
command = "chief-mcp"
args = ["stdio"]
env = { CHIEF_API_KEY = "", CHIEF_PROJECT_ID = "" }
```
Using a different client, or want HTTP transport? The full matrix is on
[MCP clients](/mcp/clients).
## Try it
Once your agent is connected, paste this in:
"Using Chief, what are the main themes across everything in my project?"
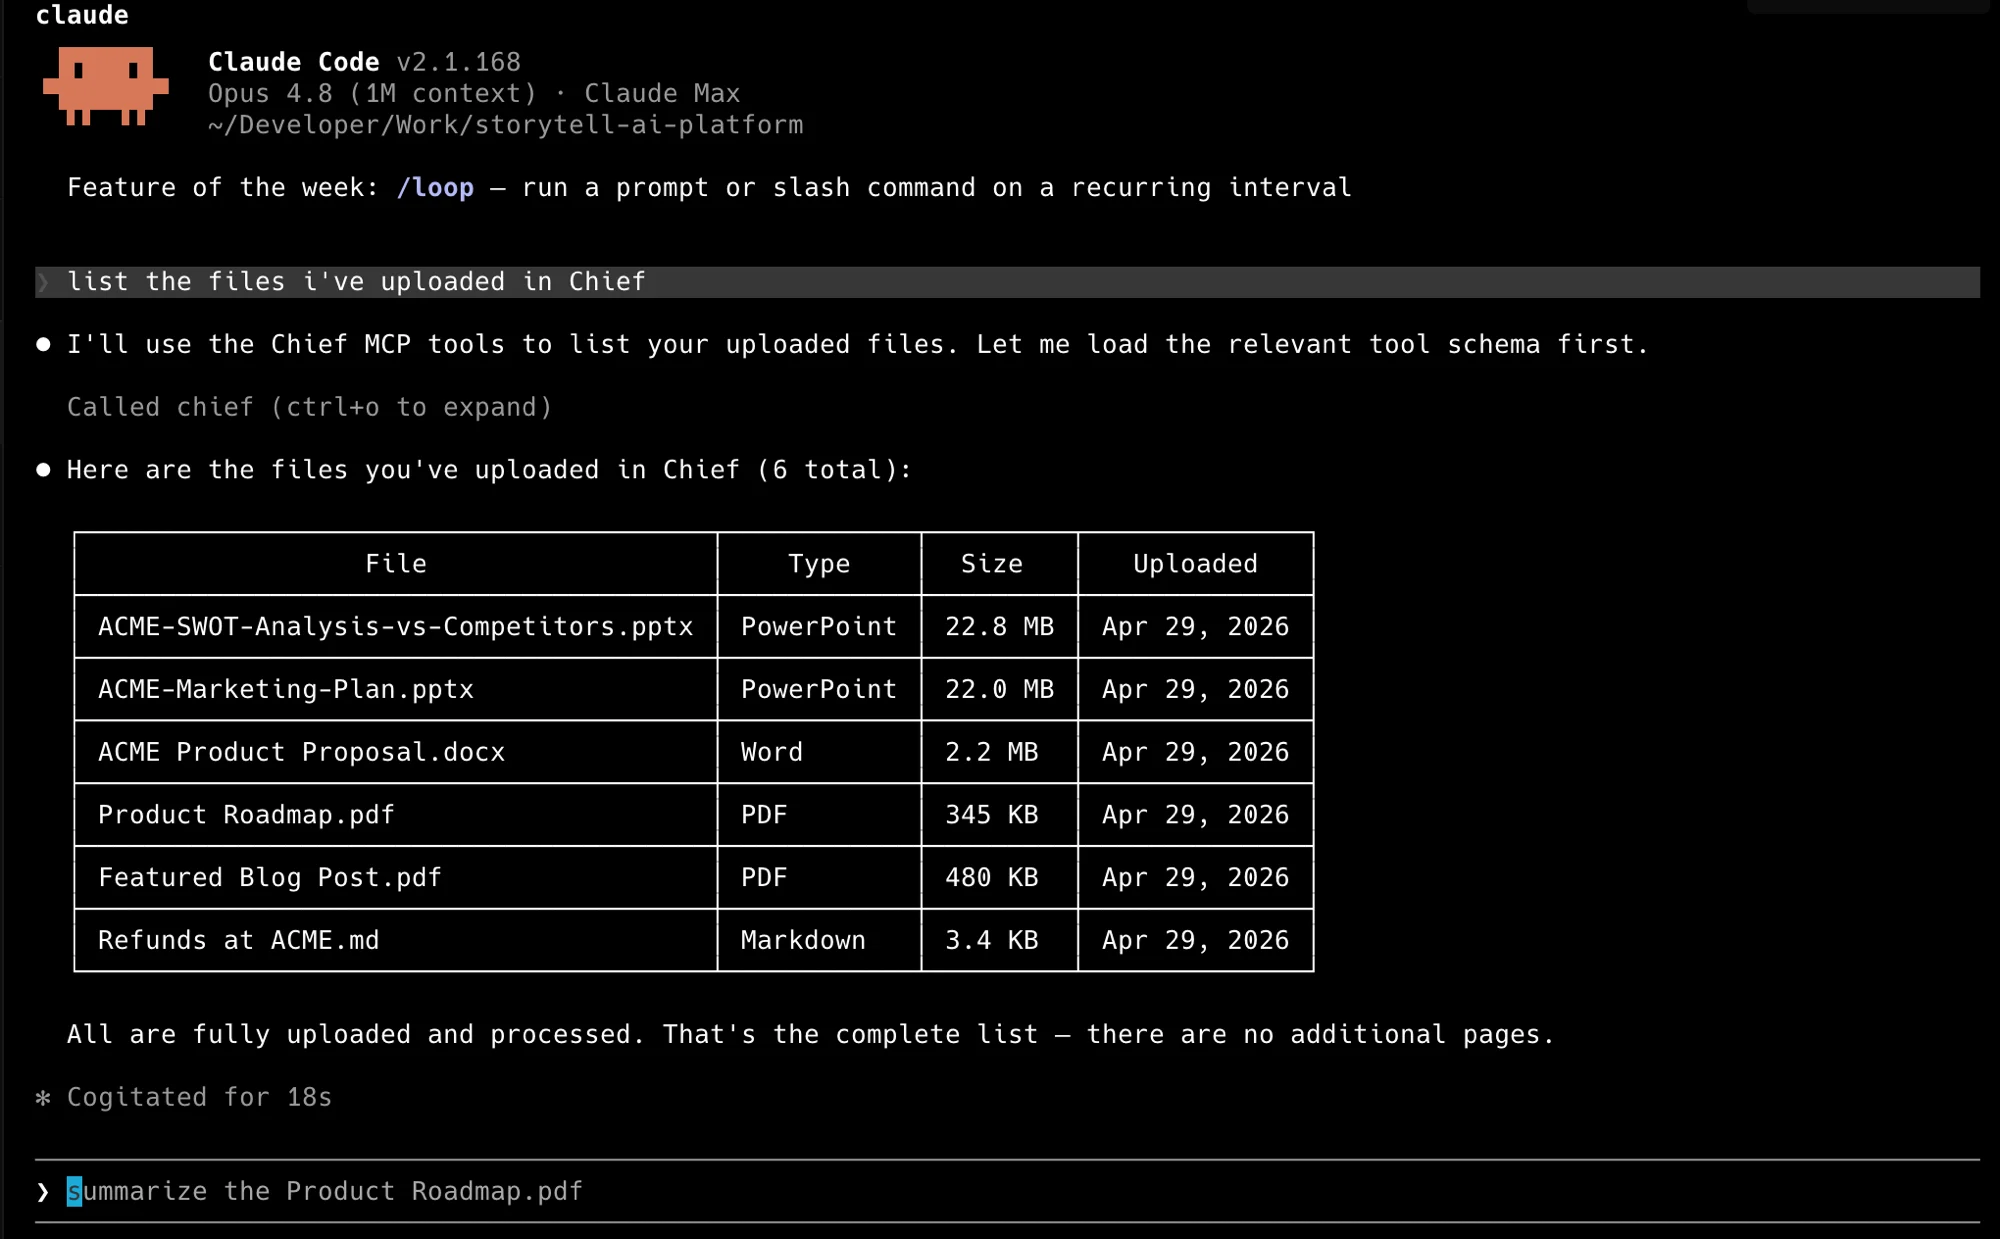
Your agent calls Chief, reads your project, and answers — no code from you. Ask it
anything about your project: list what you've uploaded, summarize a document, or pull
the themes across everything.
[](cursor://anysphere.cursor-deeplink/mcp/install?name=chief\&config=eyJjb21tYW5kIjoiY2hpZWYtbWNwIiwiYXJncyI6WyJzdGRpbyJdLCJlbnYiOnsiQ0hJRUZfQVBJX0tFWSI6IiIsIkNISUVGX1BST0pFQ1RfSUQiOiIifX0=)
After install, open the server in **Cursor Settings → MCP** and fill in your
`CHIEF_API_KEY` and `CHIEF_PROJECT_ID`. Prefer to paste config by hand? See
[MCP clients → Cursor](/mcp/clients).
Add to `~/.codex/config.toml`:
```toml theme={null}
[mcp_servers.chief]
command = "chief-mcp"
args = ["stdio"]
env = { CHIEF_API_KEY = "", CHIEF_PROJECT_ID = "" }
```
Using a different client, or want HTTP transport? The full matrix is on
[MCP clients](/mcp/clients).
## Try it
Once your agent is connected, paste this in:
"Using Chief, what are the main themes across everything in my project?"
Your agent calls Chief, reads your project, and answers — no code from you. Ask it
anything about your project: list what you've uploaded, summarize a document, or pull
the themes across everything.
 ## Have your agent build an integration for you
Connecting over MCP lets your agent *talk to* Chief. You can also ask it to *build* against
the Chief API — a script, a sync job, whatever you need — and it will read this
documentation and write the code.
In your terminal, set your credentials so the agent doesn't need them in the chat, then
describe what you want:
```bash theme={null}
export CHIEF_API_KEY="pat_xxxxxxxxxxxxxxxxxxxxxxxxxxxxxxxx"
export CHIEF_PROJECT_ID="project_xxxxxxxxxxxxxxxxxxxx"
```
### Starter prompts
A few prompts to start from — paste one in and adjust it to your goal:
* *"Read the Chief API docs at [https://dev.chief.bot](https://dev.chief.bot). Using `CHIEF_API_KEY` and
`CHIEF_PROJECT_ID` from my environment, write a script that uploads every PDF in this folder
to my project and labels them `contracts`."*
* *"Ask my Chief project for the three biggest risks across everything we've uploaded this
quarter, and print the answer."*
* *"Create a Chief action that emails me a summary of new uploads every weekday morning."*
* *"Write a script that pulls this week's new assets from my Chief project and posts a short
summary to our team's Slack channel."*
Point your agent straight at the docs and let it read what it needs. There's an
agent-readable index at [`https://dev.chief.bot/llms.txt`](https://dev.chief.bot/llms.txt).
The agent reads the [reference](/api-reference/introduction), writes the code, and runs it.
Start small, then build up.
## Prefer to do it yourself?
Zero to a chat response with plain `curl`.
Typed Go client, one service per resource.
The `chief` command for scripts, CI, and your shell.
Every endpoint, with an interactive playground.
## Have your agent build an integration for you
Connecting over MCP lets your agent *talk to* Chief. You can also ask it to *build* against
the Chief API — a script, a sync job, whatever you need — and it will read this
documentation and write the code.
In your terminal, set your credentials so the agent doesn't need them in the chat, then
describe what you want:
```bash theme={null}
export CHIEF_API_KEY="pat_xxxxxxxxxxxxxxxxxxxxxxxxxxxxxxxx"
export CHIEF_PROJECT_ID="project_xxxxxxxxxxxxxxxxxxxx"
```
### Starter prompts
A few prompts to start from — paste one in and adjust it to your goal:
* *"Read the Chief API docs at [https://dev.chief.bot](https://dev.chief.bot). Using `CHIEF_API_KEY` and
`CHIEF_PROJECT_ID` from my environment, write a script that uploads every PDF in this folder
to my project and labels them `contracts`."*
* *"Ask my Chief project for the three biggest risks across everything we've uploaded this
quarter, and print the answer."*
* *"Create a Chief action that emails me a summary of new uploads every weekday morning."*
* *"Write a script that pulls this week's new assets from my Chief project and posts a short
summary to our team's Slack channel."*
Point your agent straight at the docs and let it read what it needs. There's an
agent-readable index at [`https://dev.chief.bot/llms.txt`](https://dev.chief.bot/llms.txt).
The agent reads the [reference](/api-reference/introduction), writes the code, and runs it.
Start small, then build up.
## Prefer to do it yourself?
Zero to a chat response with plain `curl`.
Typed Go client, one service per resource.
The `chief` command for scripts, CI, and your shell.
Every endpoint, with an interactive playground.